

Installing WordPress on Ionos Hosting is a straightforward process. It allows you to create a website quickly.
This guide will show you each step clearly. WordPress powers many websites due to its flexibility and ease of use. Ionos Hosting is a reliable platform that supports WordPress well. Together, they make a perfect combination for building a website.
Whether you are starting a blog, an online store, or a business site, WordPress on Ionos Hosting is a great choice. This introduction will help you understand the process, so you can get started with your website without any hassle. Let’s dive in and see how easy it is to set up WordPress on Ionos Hosting.

Credit: www.youtube.com
Introduction To Ionos Hosting
Are you ready to dive into the world of website creation but not sure where to start? Well, let me introduce you to Ionos Hosting. If you’re a beginner or someone who doesn’t have a lot of technical knowledge, Ionos makes it easy for you. It’s like having a friendly guide by your side. Let’s explore why Ionos might be the perfect choice for you.
Why Choose Ionos
Choosing a hosting provider can be overwhelming, but Ionos stands out for several reasons. Let’s break it down:
- Affordability: Ionos offers competitive pricing, making it a budget-friendly option for beginners.
- User-Friendly Interface: The platform is designed with simplicity in mind, so even if you’re not tech-savvy, you’ll find it easy to navigate.
- 24/7 Support: Need help at 3 AM? No problem. Ionos provides round-the-clock customer support to assist you whenever you need it.
Features Of Ionos Hosting
Ionos isn’t just user-friendly; it also comes packed with features that make it a robust choice. Here are some highlights:
- Free Domain: When you sign up, you get a free domain for the first year. That’s one less thing to worry about!
- SSL Certificate: Security is crucial. Ionos provides a free SSL certificate to keep your website safe.
- Daily Backups: Worried about losing your data? Ionos takes daily backups, so your data is always safe and sound.
- Scalability: As your website grows, Ionos grows with you. You can easily upgrade your plan to meet your needs.
So, what are you waiting for? With Ionos Hosting, you’re not just getting a service; you’re getting peace of mind. Ready to install WordPress on Ionos? Stay tuned for the next steps!
Credit: www.ionos.co.uk
Preparing For Installation
Getting ready to install WordPress on Ionos hosting can be an exciting step towards launching your website. Before you dive into the installation process, it’s crucial to prepare properly. This section will guide you through the essential prerequisites and domain setup. Let’s get started!
Requirements
Before you begin, make sure you have the following:
- Ionos hosting account: You need to have a registered account with Ionos.
- Domain name: This is the address where your website will live on the internet.
- FTP client: Software like FileZilla will help you upload files to your server.
- MySQL database: WordPress requires a database to store content and settings.
Once you have these ready, you are good to go!
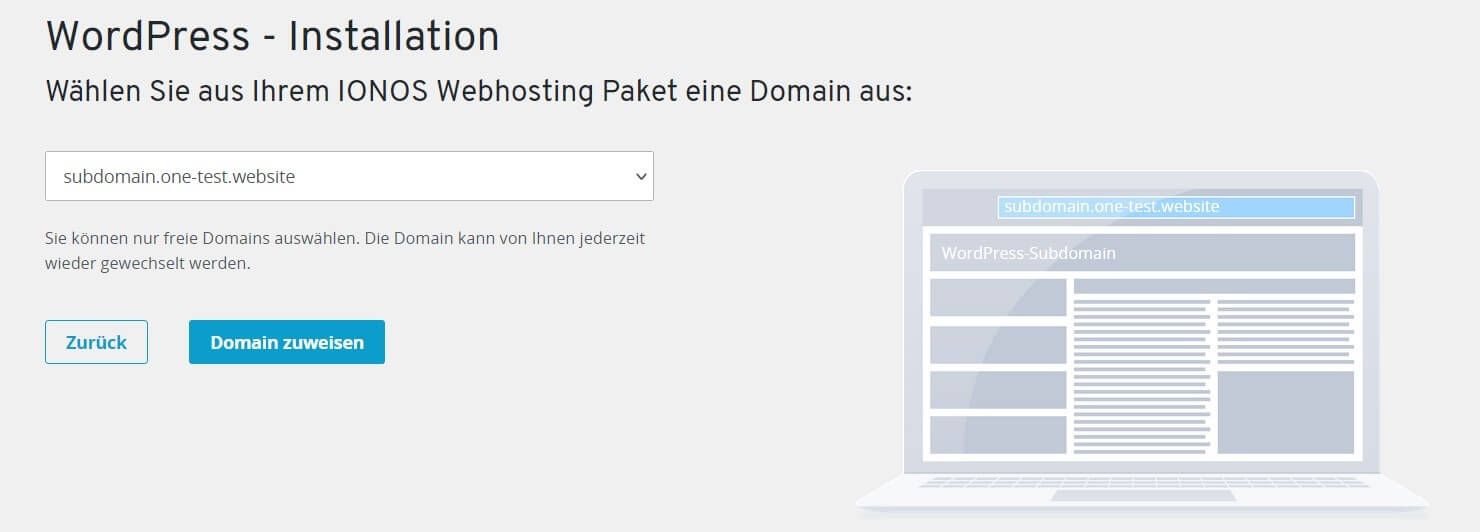
Setting Up Your Domain
Now, let’s get your domain set up. This is where your website will be accessed by your visitors. Follow these simple steps:
- Log in to your Ionos account: Head over to the Ionos website and sign in using your credentials.
- Navigate to the Domains section: You’ll find this under the “Hosting” tab.
- Add your domain: Click on “Add Domain” and follow the prompts to register or link your domain.
- Configure DNS settings: Ensure your domain points to the correct Ionos server. This is usually done automatically, but double-check to be sure.
With your domain set up, you’re one step closer to installing WordPress!
In the next section, we’ll walk you through the actual installation process. Stay tuned and happy website building!
Accessing The Ionos Control Panel
Before we dive into installing WordPress on your Ionos hosting, it’s essential to understand how to access the Ionos Control Panel. This control panel is where you manage your hosting settings, domains, and websites. Don’t worry, it’s simpler than it sounds! Let’s break it down into easy steps.
Logging In
First things first, you need to log in. Here’s how:
- Open your web browser and go to the Ionos website.
- Click on the Login button at the top right corner of the page.
- Enter your username and password. If you’ve forgotten your password, there’s an option to reset it.
- Click Login to access your account.
Easy peasy, right? Now you’re in!
Navigation The Dashboard
Once you’re logged in, you’ll be greeted by the Ionos dashboard. This is your command center. Here’s what to do next:
- Overview: You’ll see an overview of your account, including your products and services.
- Domains: Click on Domains & SSL to manage your domains. This is where you’ll link your domain to your WordPress site.
- Hosting: Navigate to Hosting to access your web hosting details. This is where you’ll install WordPress.
- Support: If you ever get stuck, there’s a handy Help & Contact section for assistance.
Navigating the dashboard might seem daunting at first, but with a bit of practice, you’ll get the hang of it. Think of it as your website’s cockpit, where you control everything.
Stay tuned for the next steps on installing WordPress, where we’ll dive deeper into setting up your website. Happy hosting!
Creating A Database
If you’ve decided to install WordPress on Ionos Hosting, you’re in for an exciting journey. One crucial step in this process is Creating a Database. This might sound intimidating, especially if you’re new to web hosting. But fear not! With this guide, you’ll have your database up and running in no time. Let’s dive right in.
Database Setup
First things first, you need to set up your database. Ionos provides a user-friendly interface that makes this task a breeze. Follow these steps to get started:
- Log in to your Ionos account.
- Navigate to the MySQL Databases section. You can usually find this under the Hosting menu.
- Click on Create Database. You’ll be prompted to enter a name for your database. Choose something meaningful, like wordpress_db. This will help you identify it later.
- Next, set a username and password. Make sure to use a strong password to keep your database secure.
- Once you’ve filled in all the details, hit the Create button. Your database is now set up!
Storing Database Information
Now that your database is created, it’s time to store its information. WordPress needs to know where to find your database and how to access it. Here’s what you need to do:
- Locate your database details in the Ionos dashboard. You’ll need the database name, username, password, and host information (usually localhost).
- Open your WordPress installation files. Look for the wp-config.php file. This file is the key to connecting WordPress to your database.
- In the wp-config.php file, you’ll find sections where you need to enter your database details. Here’s a quick overview of what goes where:
Detail Where to Enter Database Name DB_NAME Username DB_USER Password DB_PASSWORD Host DB_HOST
Save the wp-config.php file once you’ve entered all the necessary details. And voila! Your WordPress site is now linked to your database.
Creating a database might seem like a complex task, but breaking it down into manageable steps makes it much easier. Plus, once you’ve done it a few times, it’ll become second nature. So, take a deep breath, follow these instructions, and you’ll be well on your way to a successful WordPress installation.
Downloading WordPress
Downloading WordPress is a key step in setting up your website on Ionos Hosting. Before you can install WordPress, you need to get the latest version and unzip the files. This process is simple and straightforward. Let’s dive into the details.
Getting The Latest Version
First, visit the official WordPress website. Look for the download link. It is usually on the homepage. Click on the “Download WordPress” button. This will start the download. Ensure you are downloading the latest version. This ensures you have the newest features and security updates.
Unzipping The Files
After downloading, locate the file on your computer. It will be a zip file. Right-click on the file and select “Extract All.” Choose a location on your computer to unzip the files. This creates a new folder with all the WordPress files. These files are essential for the installation process.
Uploading WordPress To Ionos
Installing WordPress on Ionos Hosting is simple. First, log into your Ionos account. Then, use the 1-click installation feature to set up WordPress effortlessly.
To get started with WordPress on Ionos, you need to upload WordPress files. This step is crucial for setting up your website. There are two main ways to upload WordPress: using an FTP client or the File Manager in Ionos. Both methods are simple and effective.Using Ftp Client
First, download an FTP client like FileZilla. Install it on your computer. Open FileZilla and enter your Ionos FTP credentials. Connect to your Ionos server. In the local site panel, find the WordPress files on your computer. Drag these files to the remote site panel. Place them in the root directory of your Ionos hosting. Wait for the transfer to complete. This method is fast and reliable.File Manager Upload
Log in to your Ionos account. Go to the hosting section. Open the File Manager. Click on the “Upload” button. Select the WordPress zip file from your computer. Upload the zip file to the root directory. Once uploaded, extract the zip file. Your WordPress files are now in place. This method is straightforward and user-friendly. “`Running The WordPress Installation Script
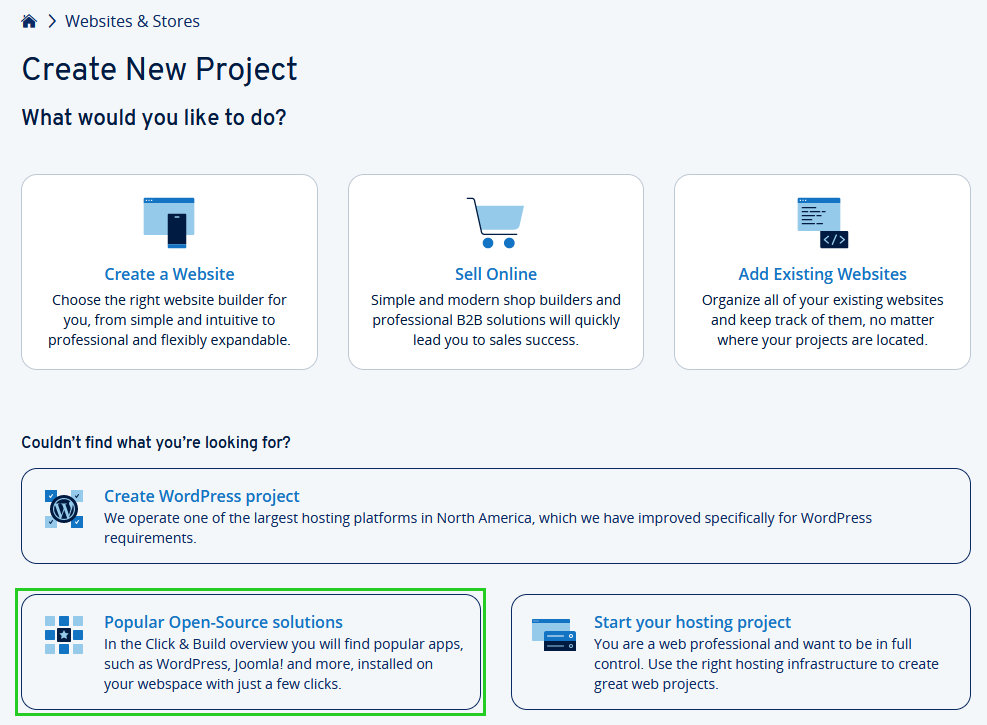
So, you’ve decided to dive into the world of WordPress and you’ve chosen Ionos Hosting as your platform. Great choice! Now, let’s walk through the exciting part – running the WordPress installation script. Don’t worry, it’s easier than it sounds. By the end of this guide, you’ll have your WordPress site up and running. Ready? Let’s get started!
Accessing The Script
First things first, we need to access the WordPress installation script. This is where the magic begins. Here’s how you do it:
- Login to Your Ionos Account: Use your credentials to log in to your Ionos hosting account. Simple, right?
- Navigate to Your Hosting Package: Once logged in, find your hosting package. Usually, it’s under the ‘My Products’ section.
- Access the Control Panel: Click on ‘Manage’ next to your hosting package to access the control panel.
- Open the File Manager: In the control panel, find and open the File Manager. This is where you’ll upload your WordPress files.
- Upload WordPress: Download the latest version of WordPress from the official site, then upload it to your file manager.
Now, with WordPress files uploaded, it’s time to run the installation script.
Configuring Settings
Next up, configuring the settings. This is where you get to personalize your WordPress site. Don’t worry, it’s straightforward. Here’s a step-by-step guide:
- Run the Script: In your browser, enter your domain name followed by
/wp-admin/install.php. This will start the installation script. - Select a Language: Choose your preferred language for WordPress. Easy peasy!
- Database Details: Enter your database name, username, password, and host. If you’re unsure, check your Ionos account for these details.
- Site Title: Give your site a title. This can be changed later, so no pressure.
- Create an Admin Account: Create a username and password for your WordPress admin. Make sure it’s secure!
- Install WordPress: Click the ‘Install WordPress’ button. You’re almost there!
And voilà! You’ve successfully installed WordPress on Ionos hosting. Pretty straightforward, right? Now you can start customizing your site to your heart’s content. Enjoy your WordPress journey!
Finalizing WordPress Setup
Finalizing your WordPress setup on Ionos Hosting is an exciting step. This is where you can start making your website look and function the way you want. There are a few key steps to take to ensure your site is ready for the world.
Choosing A Theme
The first step in finalizing your setup is selecting a theme. WordPress offers many free and paid themes. Choose a theme that fits your website’s purpose and style. Go to the Appearance menu and click on Themes. Browse through the available options. Once you find a theme you like, click on Install, then Activate. This will apply the theme to your site.
Installing Essential Plugins
Plugins add functionality to your WordPress site. Start with essential plugins. Go to the Plugins menu and click on Add New. Search for plugins like Yoast SEO for search engine optimization, Akismet for spam protection, and WP Super Cache for site speed. Click on Install Now, then Activate. This will enable the plugins on your site.
Finalizing your WordPress setup with a theme and essential plugins sets a strong foundation. Your website will look good and function well. Now, you are ready to add content and launch your site.
Troubleshooting Common Issues
Installing WordPress on Ionos hosting can be straightforward. Sometimes, you might face common issues that need troubleshooting. Understanding these common errors and knowing how to get support can save time and reduce frustration.
Common Errors
One common error is the “Database Connection Error.” This happens when WordPress can’t connect to your database. Check your database credentials in the wp-config.php file. Ensure they are correct.
Another frequent error is the “White Screen of Death.” This blank screen appears due to plugin conflicts or theme issues. Disable your plugins one by one to find the culprit. Switching to the default theme can also help.
Sometimes, you might see a “403 Forbidden Error.” This error usually stems from incorrect file permissions. Adjust your file permissions through your hosting control panel. Ensure directories are set to 755 and files to 644.
Getting Support
Ionos offers support through their website and customer service. You can reach out via their live chat or phone support. Be ready with your account details and a description of your issue.
The Ionos Help Center also provides guides and tutorials. These resources can help you troubleshoot common issues on your own. Search for your specific problem to find tailored solutions.
Another helpful option is the WordPress community. Forums and user groups can provide answers and share experiences. This is a great way to solve issues and learn from others.
Credit: www.ionos.com
Frequently Asked Questions
Can I Install WordPress On Ionos?
Yes, you can install WordPress on IONOS. It offers easy one-click WordPress installation for users.
Is Ionos Compatible With WordPress?
Yes, IONOS is compatible with WordPress. It offers easy WordPress installation and management, ensuring optimal performance.
How Do I Link My Ionos To WordPress?
Link IONOS to WordPress by installing WordPress on your IONOS hosting account. Follow the setup instructions provided by IONOS.
How Do I Install WordPress On My Hosting Server?
To install WordPress, download it from wordpress. org, upload files to your server, create a database, and run the installation script. Follow the on-screen instructions to complete the setup.
Conclusion
Installing WordPress on Ionos Hosting is simple. Follow the steps provided. Log into your Ionos account. Use the 1-click installer. Configure your settings. Choose a theme and plugins. Personalize your website to reflect your brand. With these steps, your WordPress site will be up and running.
Enjoy creating and managing your new WordPress site with ease. Happy blogging!
